Welcome to our guide on how to blow in insulation. It’s for homeowners and DIY fans. Insulation helps your home use less energy, save money, and feel better.
Blown-in insulation like fiberglass and cellulose is cheap. It makes your home work better.
We’ll show you how to do it all, from getting ready to putting in the insulation. You’ll get great results with the right tools and info. Your home will be more comfy and save you money.
Key Takeaways
- Understand the benefits of blowing in insulation for energy efficiency and comfort.
- Choose the right blown-in insulation material based on your needs and budget.
- Prepare your space properly to ensure successful insulation installation.
- Follow safety precautions, including the use of personal protective equipment.
- Avoid common mistakes to ensure effective insulation performance.
- Regularly inspect insulation and address settling or damage promptly.
Understanding the Importance of Insulation
Learning about insulation is key to making your home better. Good insulation stops heat from moving in or out. This keeps your home at a steady temperature all year.
This steady temperature brings many benefits. It makes your home more comfortable and saves money too.
Benefits of Proper Insulation
Getting insulation means your home uses less energy. Here are the main advantages:
- Energy Efficiency: A well-insulated home uses less energy for heating and cooling. This means lower bills.
- Cost Savings: Insulation saves money over time. It’s worth it for the lower utility costs. Aim for R-38 in attics and R-49 in cold areas.
- Improving Comfort: Good insulation stops drafts and keeps temperatures steady. This makes your home more comfortable and quieter.
Energy Efficiency and Cost Savings
Insulation makes your home more energy-efficient, saving money. The right amount depends on your climate and heating and cooling systems. The quality and how it’s installed affect its performance.
It keeps your home warm in winter and cool in summer.
Improving Home Comfort
Insulation does more than save money. It keeps your home at the perfect temperature. It’s about keeping warmth or cool air in.
To learn more about insulation, check out a guide on blown-in insulation.
Types of Blown-In Insulation Materials
Choosing the right insulation for your home is important. There are many types of blown-in insulation. Each has its own benefits. It’s key to know what they offer before you decide.
Cellulose Insulation
Cellulose insulation comes from recycled paper. It’s treated to be fire-resistant. This green option has a high R-value, making it popular for those who care about the environment.
Its loose nature fits well into odd spaces. This helps block air from getting in.
Fiberglass Insulation
Fiberglass insulation is known for being affordable and light. It’s also fire-resistant, making it safe to use. This material creates a good thermal barrier.
It’s easy to install, especially in tricky spots. This makes it a favorite for many.
Mineral Wool Insulation
Mineral wool insulation comes from recycled stuff. It’s great at blocking sound and is fire-resistant. Its density helps control heat and air.
Many pick mineral wool for its durability and moisture resistance. It lasts longer than some other options.
| Type of Insulation | Material Composition | R-Value | Fire Resistance | Moisture Resistance |
|---|---|---|---|---|
| Cellulose Insulation | Recycled paper | High | Yes | Moderate |
| Fiberglass Insulation | Fiberglass strands | Moderate to high | Yes | Good |
| Mineral Wool Insulation | Recycled materials (slag/rock) | Moderate | Yes | Excellent |
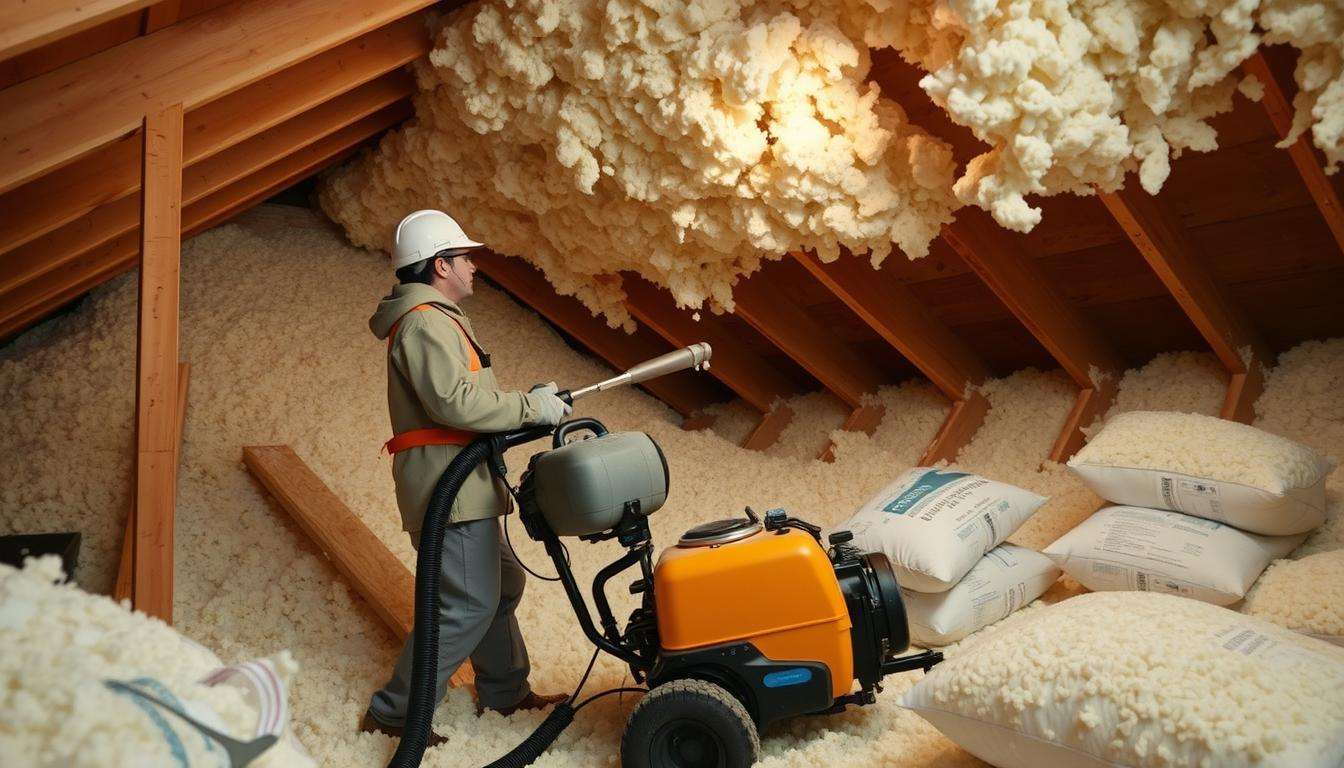
Tools and Equipment Needed for the Job
Before you start your insulation project, make sure you have all the tools and equipment. Being ready helps you work faster and better. You’ll need these items to blow in insulation well.
Insulation Blower Overview
The insulation blower is very important for this job. It helps you blow cellulose insulation into your attic or walls. You can rent or buy an insulation blower at home improvement stores. Some stores offer free rentals if you buy a lot of insulation.
Having an insulation blower saves time and effort. It’s much better than doing it by hand.
Safety Gear Essentials
Wearing the right safety gear is very important. You’ll need:
- Dust mask to keep out insulation particles.
- Safety glasses to protect your eyes.
- Heavy work gloves to keep your hands safe.
- Knee pads for comfort and knee protection.
Wearing safety gear lets you work safely. It helps avoid health problems.
Additional Tools and Supplies
You’ll also need some extra tools for insulation. Get:
- Caulk gun for sealing air leaks.
- Utility knife for cutting insulation.
- Flashlight for seeing in dark places.
- Drop cloths to catch spills.
- Duct tape for holding insulation in place.
- Shop vacuum for cleaning up.

With the right tools and safety gear, you’re ready for a great insulation job. For more tips, see this guide on blowing in insulation.
Preparing Your Space for Installation
Getting ready for insulation is key to a good job. It helps meet building codes and saves energy. Here are the main steps for a great setup.
Assessing Attic and Wall Spaces
First, look at the areas you’ll insulate. Check the attic and walls for insulation. Many homes need more, especially in cold places.
Building codes say attics should have at least 12 inches of insulation. For ceiling insulation, aim for R-38. In very cold areas, go for R-49 for warmth.
Sealing Gaps and Cracks
Next, seal any gaps or cracks. This is crucial for good insulation. Air leaks can make insulation less effective.
Use caulking for small gaps and spray foam for big ones. A sealed space keeps air out, making your home cozier.
Establishing a Clean Workspace
Keep your workspace clean for safety and efficiency. Clear out any mess and make sure it’s well-lit. This helps you avoid accidents while installing insulation.
Installing blown-in insulation can take a few days, depending on the size of your project. A clean area makes the job easier.
| Preparation Task | Description |
|---|---|
| Assessing Spaces | Evaluate attic and wall conditions for existing insulation. |
| Sealing Gaps | Use caulking and spray foam to seal any air leaks. |
| Clean Workspace | Remove debris and ensure good lighting for safety. |
Step-by-Step Guide to Blowing in Insulation
Blowing in insulation makes your home more energy efficient. It’s great for attics and walls. Follow this guide for a smooth process.
Setting Up the Insulation Blower
Start by setting up your insulation blower right. Connect the hose well and read the instructions. Wear safety gear like eye protection and gloves.
Filling Attic Spaces
Begin at the farthest point from the hatch in your attic. Move from the center, filling three bays at once. Make sure to cover corners and edges well.
Stretch insulation to the edges for the best results. Use a slow motion until it’s just right.
Insulating Walls Effectively
Now, use the blower to insulate your walls. Access wall cavities carefully. Check depth and coverage often.
It might take a few days, but it’s worth it for your home’s energy savings.
Safety Precautions to Consider
Keeping safe during your insulation project is very important. Knowing the key safety steps can stop accidents and make the job easier. Here are important things to do to stay safe while working with insulation.
Personal Protective Equipment
Wearing the right gear is key to staying safe. Make sure you have these items in your safety kit:
- A dust mask to keep insulation fibers out of your lungs.
- Gloves to protect your skin from getting irritated.
- Safety goggles to keep dust and debris out of your eyes.
- A hard hat for extra safety in small or tight places.
Ventilation Requirements
Make sure the area where you’re working has good air flow. Good air flow stops you from breathing in dust or fumes. Open windows and use fans to move air around if you need to. This is very important for keeping the air clean and you healthy.
Handling Insulation Materials
Handling insulation materials the right way is important for safety. Follow these tips:
- Always follow the instructions from the insulation’s maker.
- Keep insulation dry and don’t squish it, as this can make it less effective.
- Check the materials for damage before using them and throw away any that are bad.

| Safety Precaution | Description |
|---|---|
| Wear PPE | Dust mask, gloves, safety goggles, hard hat. |
| Ensure Ventilation | Open windows and use fans for air circulation. |
| Follow Handling Guidelines | Proper storage and checking for damage before use. |
By following these safety tips for insulation, you can make your work area safer. This will help you get the best results from your insulation project.
Common Mistakes to Avoid
When you install insulation, it’s easy to miss important details. Knowing these mistakes can help you do a better job. It also keeps your home safe.
Over Inspection and Miscalculation
One big mistake is checking too much. This can lead to wrong R-value calculations. Make sure to plan well but don’t get stuck on small things.
Remember, spending too much time on small details can slow you down. It’s better to focus on the actual work.
Ignoring Safety Protocols
Not following safety rules can cause accidents. Always wear masks and gloves. Make sure your area is well-ventilated.
Ignoring these steps can harm you and mess up your project. It’s important to stay safe.
Inconsistent Insulation Depth
It’s key to have the same insulation depth everywhere. Check it often to keep it even. If it’s not even, your home won’t stay warm or cool right.
This can make your home lose heat or cold. It also means you’ll use more energy and spend more on bills.
| Mistake | Impact | Suggestions to Avoid |
|---|---|---|
| Over Inspection | Delays progress, leading to potential issues in installation. | Prioritize essential details, perform calculations beforehand. |
| Ignoring Safety | Increases risk of accidents during installation. | Use safety gear, ensure proper ventilation. |
| Inconsistent Depth | Causes uneven heating and increased energy costs. | Regularly measure insulation depth throughout the process. |
Maintaining Your Insulation
Keeping your insulation in good shape is key. It helps your home stay warm and saves energy. This guide will show you how to check and fix your insulation.
Inspecting Insulation Over Time
It’s important to check your insulation often. This helps find problems early. Here are some tips:
- Look for unusual gaps or spaces.
- Check for signs of moisture, mold, or mildew.
- Review energy bills for sudden increases that may indicate insulation failure.
Signs of Settling or Damage
Watch out for these signs that your insulation might be failing:
- Drafts or cold spots in your home.
- Unpleasant odors potentially due to mold growth.
- Visible degradation or sagging of the insulation material itself.
Fixing these problems fast can save you money and keep your home safe.
When to Reapply Insulation
Knowing when to replace insulation is important. You might need to do it every 15 years, depending on the type. If you find big problems, you might need to do it sooner.
| Insulation Material | Replacement Frequency | Signs for Reapplication |
|---|---|---|
| Cellulose | Every 15 years | Settling or damage visible |
| Fiberglass | Every 15 years | Drafts and increase in energy costs |
| Mineral Wool | 15-20 years | Moisture intrusion or odor |
By taking care of your insulation and knowing when to replace it, you can make your home more comfortable. This will keep your home safe and welcoming for a long time.
Conclusion: Final Thoughts on Insulation
Investing in blown-in insulation makes your home better. It’s good for keeping warm and cool. Materials like fiberglass and cellulose help a lot.
Blown-in insulation is great for tight spots. It makes sure your home stays the right temperature. Plus, it doesn’t mess up your home too much when you put it in.
Starting this DIY insulation project is a smart move. It will make your home more energy-efficient and cozy. Good insulation is key to a better home.
After you finish, think about more ways to improve your home. You could work on air flow or get new windows. Every little bit helps make your home better.
Your hard work will make your home more comfortable and green. We’re excited to see how it turns out!